Sunday, November 29, 2015

The Very Sparkly, "Liquid Sunshine" Dress

My junior year of high school I refashioned a prom dress for myself. My senior year of high school I made my prom dress. Ever since I've wanted to either make or refashion another formal gown, but I've had no reason too. So this summer when my childhood best friend asked me if I would be willing to make her a pageant gown I, of course, said YES! Then she happened to find, and fall in love with, a very sparkly gown. It was just her style and looked stunning on, but still, dang it. I had really wanted to make her a dress!


This perfectly sparkly dress however, was not the perfect fit, so I offered to alter it for her.


After discussing a few ideas for the alterations that needed to be done, we decided to go a completely different, slightly easier, way more fun, direction. My friend's favorite part of the dress was the sequin covered skirt. Thus, we decided to scrap the ill-fitting bodice and design a new, perfectly fitting and flattering bodice to go with the perfectly sparkly skirt. We went to Joann's and came home with some matching gold-colored satin, lots of sequin trim, and Butterick B6052.
I sewed a mock-up of the new bodice from some old curtains in my stash. Once the mock-up was fitted perfectly to my friend I cut it apart. It then became the bodice pattern, and I cut into the pretty, shiny, gold, satin.


I sewed together the new bodice, and got to try out my brand new invisible zipper foot (which is awesome).

Finally I sewed on lots of sequin trim to make the new bodice look like it belonged with the extremely sequined, sparkly, skirt.


The finished product? A very sparkly, one of a kind, liquid sunshine, pageant gown.


My friend looked absolutely stunning, and did very well at her pageant (4th runner up!!), and I got to refashion another formal gown! This was a very fun and rewarding project. Now, does anyone else need a formal gown? I want another project!


Saturday, November 28, 2015

The 1920's Tour Guide Costume


This fall my youngest two siblings got to participate in one of my favorite activities from junior high and high school. An activity I did every year from 7th to 12th grade, the homeschool co-op play.  The plays I did were set in multiple time periods, from medieval to modern(ish). We did dramas and we did comedies. We had a magnificent director, who made us learn our lines (and got a little scary in the weeks leading up to the play), then told us how awesome we did and how proud she was of us once opening night came. Those are some of my favorite memories from high school. So, of course, I was thrilled that my siblings were doing the play this year.

The same director, new kids, new play, same excitement. This year's play was a mystery story (with a touch of comedy), set in the 20's. A very valuable necklace got stolen, who stole it? Well, definitely not the tour guide. Before that could be proved, however, Cathy the tour guide, also known as my little sister, needed a costume.

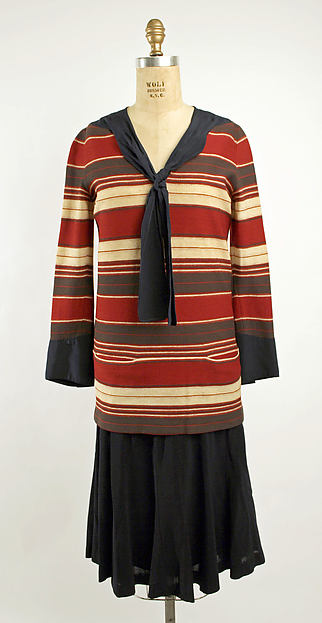
Once I heard what the time period for this play was, I starting looking at pictures of 1920's dresses. There were lots and lots of pictures of flapper dresses, not what my sister needed. Finally I found some pictures of 20's day dresses that I liked. This one from the MET museum became the base of the design for my sister's tour guide costume.

Ensemble

Now since this was just a costume, it only had to look like the correct time period, not be constructed, using historically accurate patterns, as if it was from the time period (which is the goal with my historical clothing) So, I found a few patterns I already had, traced them onto plaid brown paper, and combined them to get the right dress shape.


I added a few details to make the dress as historically accurate looking as possible, then got the dress sewn up in one afternoon.


Next came the hat. After looking all over town we couldn't find a hat that looked like it was from the 20's, or even one I could alter so that it would appear to be a 20's hat. I was going to have to make one, and I had no idea how. After a bit of thought I decided to start with a piece of felt and the Styrofoam head I store my historical bonnets on.


I draped the felt over the head and started pinning. Eventually I had something that resembled a 20's hat.

1920s hats #vintage #fashion #1920s #hats:

I drew lines onto the felt were all my pins were, then unpinned the felt.


This would be my pattern. I cut it apart along the lines I had drawn, the laid it out on the wool felt I planned make the hat from


I sewed together the wool felt, then added a brim and some embellishment, and was pleasantly surprised by the hat that emerged! 


Was it perfectly historically accurate? Far from it. Did it give my sister the right look when she was on stage? Yes, absolutely. Did she do amazing at her role? YES, YES, YES! I am so proud of my siblings and the rest of the cast. They did amazing and kept the audience laughing all night. The play was a success, and the cast looked like they stepped right out of the 20's.
Who stole the missing necklace? The jilted fiancé. What will next year's play be? I have no idea, but I'm looking forward to it, as are my younger siblings!


Monday, November 23, 2015

The Perfect Purse Pattern - The Anya Bag

For approximately the past 2 years I have wanted to make myself a purse. I have searched for a pattern, even picked up a few at pattern sales, but never got around to making one. Every time my purse would wear out I'd look at patterns again, then find the perfect fabric, then just buy a purse. Yep, my grand plan to sew myself a purse apparently wasn't happening.
Well, a few weeks ago Zoe, from So Zo What Do You Know, announced she was going to be releasing a purse pattern, the Anya Shoulder Bag. She needed testers. Perfect! A purse pattern, that I liked, that I already had fabric for, with a deadline? This could work. I might actually make myself that perfect purse I've been planning for two years! (Yeah, I'm a bit of a procrastinator. I work best on a time crunch, things get done if there's a certain time I have to have them done by.)
So, I volunteered as a tester, and got sent the pattern and got to work. In one morning I got the bag sewn.


This pattern is great. The instructions are very clear with pictures illustrating each step. Extremely easy to put together, no matter your sewing experience, and extremely cute.  Definitely worth buying. Just making one purse from this pattern wasn't enough for me. I still had fabric left in my stash to make another purse out of! So, I gave my mom the first purse and got to work on a second one, for me.


From my stash I picked out a leather looking vinyl skirt I made myself in high school (it had a few issues) and a pair of black skinny jeans I never wore. The skirt would turn in to the body of the bag. The jeans? The yoke and straps. For the lining I found a scrap of black calico (left over from the Zelda costumes I made).
Then I decided to personalize the pattern, because as much as I like the original, there are certain things I always look for in a purse. Pockets are one of those. I added 2 big patch pockets to the lining and one pleated pocket to the front of the bag.


Then I just made one long strap, rather than 2, so that the purse would be a cross-body bag rather than a shoulder bag.
I added a little decorative stitching on the yoke, and my perfect, made by me, purse was done! After putting this off two years, it only took one evening to make!


After a week of this bag being my purse I'm still quite happy with it! At first I was worried about the lack of a zipper on the top of the bag. On my old purse however, I always forgot to actually zip it closed, so no zipper has been no problem. I've actually been better at remembering to button closed this purse then I ever was at remembering to zip the zipper on my old one. The only thing I might change? I'm thinking of add buttons to the interior patch pockets, as they like to gape open.


The exterior pockets however are great! I can always find my keys when I need them. Over all, I'd have to say that my attempt to make myself a purse has been successful!


A huge thanks to Zoe for putting out the perfect pattern for a project I'd been putting off, then choosing me as a tester so I actually got it done! I highly recommend this pattern to any one who wants to make a purse. I can totally see myself using this pattern again and again. (I'm already thinking of ways to make the next purse just slightly different from this one.) Maybe my days of buying purses are over!

Saturday, November 14, 2015

The Swingy, Stripey, Knit, Top

You may have noticed, when I get into something, I get really into it. Goats? Ask anyone I went to high school with who I was and they'd say "the goat girl". Historical clothing? When one dress is done I'm all ready to start on the next. Clothing made out of shirts? Once one item was done I immediately had an idea for the next. Knit fabric? I'm getting the hang of it! By sewing one thing after another.

Last time I went to Joann's I went for one specific piece of fabric. Well, unsurprisingly, I came home with more than I went for! A teal and white/silver striped knit caught my eye. So I grabbed it, then noticed that McCall's patterns were on sale. Of course I had to look through the pattern book! I found a pattern that would be perfect for the teal fabric. Yep, both came home with me.

As you can see, the pattern was for a dress. Well, I really don't need any more dresses, so I shortened it into a shirt. I added a little extra width to each shoulder, slightly shortened the sleeves, and made the neckline a bit bigger. I cut out the shirt and sewed it together. 


This shirt went together really easily! The blue knit fabric I used to make one of the 3 dresses with was very thin, stretchy, and tightly knitted. This fabric? It was thin, stretchy, and loosely knitted. The looser knit of the fabric meant the sewing machine needle could easily get through the fabric. Thus the needle didn't push the fabric down into the sewing machine, causing it to "eat" the fabric, something that happened several times with the blue knit! Still though, due to the stretch factor, I wasn't sure I could achieve a nice, neat hem on this shirt. Luckily, one trend I've noticed, and really liked, lately is lace at the bottom of sweaters. 


Now, this isn't exactly a sweater, but I figured a little lace wouldn't hurt anything. Sewing the lace onto the bottom of the shirt made the fabric a bit more stable, and much easier to hem! Thus, I hemmed the shirt, bound the sleeve hems and neckline with strips of fabric, and the shirt was good to go!


Comfy, swingy, and pretty.


A lovely addition to my everyday fall wardrobe.

I can see this shirt getting lots of wear! Now, back to Joann's for more knit fabric? 


Well, I'm beginning to think I really, really don't need anymore clothes for myself, especially shirts. So, I'd better avoid the fabric store for a little while ("Nooooooo, I don't wanna!"), and find something else to really get into sewing. Christmas presents maybe? Something that uses up (a little) of the fabric in my gianormous stash? Hmm, I should get onto figuring that out. Any suggestions? I could use a bit of help here!


Friday, November 13, 2015

Sewing With Knits: A Tale of 3 Dresses

I have no issue with sewing fancy historical dresses, modern strapless formal dresses, or anything else that might be asked of me. But sewing something out of knit fabric? Due to the one time I tried to hem a swimsuit when I was 12, knit fabrics scare me. They're unpredictable! The sewing machine eats them! They stretch in weird ways!

Well, over the past year or so, I've been making myself sew with knits, occasionally. I made my mom a shirt. It turned out well. (I didn't hem it) I made the stockings to go with my historical clothing. They turned out well. My trepidation about sewing with knits has slightly decreased. In fact, it has decreased enough that I actually readily agreed to take a commission, of 3 (yes three) knit dresses.

What was supposed to be one dress turned into two when we started looking at patterns. Two dresses turned into three when we started looking at fabric. Fabric stores are just that way. All the pretty fabric! All the new ideas! It's nearly impossible to leave with just the one thing you came in looking for. On this particular day I came home with this:


Patterns, fabric, a piece of paper with measurements on it, and a promise that the dresses would be done soon. I was excited about these dresses, as we'd come up with some pretty cool design ideas for them, but also a little nervous, because, eek, knits!

The first dress I decided to make was the gray one, because I loved the fabric! Not only was the fabric pretty, but I also had no issues sewing it. No weird stretching and the sewing machine didn't try to eat it!


To finish the neckline, the pattern called for a narrow hem, still a little nervous about the whole hemming thing, I opted instead to finish the neckline with a strip of some contrasting fabric. 


Which worked really well! Due to a shortage of the gray fabric (Joann's only had about 2/3 the amount we needed), I also used the contrasting fabric for the sleeves, then finished them with a cuff made from the gray fabric. This dress came together pretty quickly, soon it was ready to be put on the dress form so I could check the fit. Well, it was rather loose and shapeless, so I added a couple darts down the front.


These fixed the issue, giving the dress shape so that it was ready to be delivered!


With the gray dress done I was now ready to tackle the blue dress. Same pattern, just thinner, stretchier fabric. This time I chose to hem the neckline like the pattern said to. 


That went. . . okish? It looked fine, but not great. It got done, but not easily. I left the neckline hemmed, but chose to avoid hemming the sleeves and skirt. Instead I cut a bunch of small half circles and sewed them together to make a ruffle for the bottom of the skirt, plus one for each sleeve. Since knit doesnt fray, no hemming was required to make the dress look finished. A couple darts, like on the gray one, and the blue dress was done!


Next up was the purple dress. The blue fabric was certainly trickier to sew than the grey, so I looked forward to seeing how the purple compared. Well, it was thinner and stretchier than the gray, but much more stable than the blue. The dress went together easily, even the bottom hem turned out well. Then I hemmed the sleeves.


I was not happy with the result. So I chopped off the sleeve hems and bound the sleeves with a folded over strip of fabric instead.


Much better! The purple dress was done!


I'm satisfied with how all three dresses turned out, as is the customer. Are they perfect? Not quite. Did I learn anything making these dresses? Yes. For example, Ive read its easiest to sew knits with a shallow zig-zag stitch if you're using a regular sewing machine. So that's what I did. Well, after some trial and error, I discovered that just the normal straight stitch worked best on the very thin, stretchy, blue fabric. Not at all what I expected! Am I more comfortable sewing with knits? Absolutely! In fact, I already bought some more knit fabric. What will it turn into? I'll keep you posted!


Wednesday, November 11, 2015

Pretty Fabric, Turned into a Shirt

This fabric. I love it. Both sides are super soft and gorgeous. It's a knit, yet surprisingly easy to work with. (I'm slightly terrified of working with knits, by the way, but I'm working on getting over that.)


I got to use this fabric to make a friend a dress. Along the way I decided I would have to get more of the fabric for me. It was so pretty and soft! This decided, I just needed to figure out what my fabric would turn into. A dress? No, I didn't want to appear to copy the dress I had just made my friend. A skirt, nah, I don't wear skirts enough to justify that. A shirt? Yes! But what sort of shirt? I had a million different design ideas flying through my mind.
Finally I managed to capture of few of those ideas and sketch them out, along with a diagram of the pattern pieces I would need.


A shirt that would be comfy and showcase both sides of the pretty fabric, perfect. Now I just needed the fabric. So I went to JoAnn's, only to discover they were still out of the fabric! (As a few weeks ago we bought all they had to make that dress) Just as I was about to leave, with plans to check back next week, another fabric caught my eye. It was the same fabric, double layer knit with stripes on one side and little bitty dots on the other, only in black instead of gray! So I got a yard of the super soft, gorgeous, black fabric, and took it home to make my shirt.


First I made my pattern. I traced a shirt I already had for my base, then turned that into what I wanted.


I cut out the fabric and sewed the shirt together. It all came together in about an hour!
Now, since I really dislike hemming knits, I bound all my edges with folded over strips of the fabric.


The neckline binding stuck out a little strange though, so I ran a piece of elastic through it to keep it in place.


Other than that issue, the shirt came out exactly how I imagined it. A definite win as my pattern drafting skills are very limited!


This shirt is super comfortable, and perfect for wearing with jeans. A great addition to my rotation of everyday clothes.


Will I use my newly made pattern again? Absolutely! Next time though, I'll get a bit more fabric, only a yard was cutting it kinda close. I had to use 3 pieces, instead of the originally planned 2, for the sleeves. My binding is pieced together, not on the grain, scrapes. Thus, accounting for the neckline not laying right without elastic. Next time I'll get a yard in half of fabric, but really, that's the only change I think I need to make. Not bad for a first try, huh?


Sunday, November 8, 2015

The Ill-Fitting to Wearable Red Shirt

I was given this shirt. I really liked it. Except for two things. It didn't fit right in the bust or the sleeves. It was too short. 


I considered leaving it be, and just wearing it as it was, too short and uncomfortable. I had no idea how to fix it. I was afraid of messing it up. Then I decided that was silly. After all, it wasn't going to get much wear as it was. What did I have to lose by attempting to fix it? Nothing. So out came the scissors.


I started by cutting off the sleeves to elbow length. This gave me sleeves that were a comfortable length plus fabric to lengthen the bodice with.


Next I cut the shirt in half just above the waist band.


And lengthened the bodice with the fabric from the sleeves, making it the perfect length.


I added some elastic to the new seam so that the shirt wouldn't ride up while being worn.


There was a little leftover fabric, which I used to finish the sleeves with.


To complete the look, and hopefully make the shirt appear a little less altered, I sewed some tan buttons (from my awesome thrifted stash) down the front.


I also added a button to each sleeve, so that they would be a bit more fitted at the elbow.


Then, it was done.


And totally wearable.


Success!